Contents

[DATA] 訊息佇列 04 - RabbitMQ x Python 程式實作範例

前言

上一篇文章我們已經把 RabbitMQ Server 的環境架設起來,並在網頁管理介面上體驗建立 Queue 和 Publish / Get 訊息,系列文的最後一篇終於要來寫 code 了,我們將使用 Python 的 Library - Pika 與 RabbitMQ 進行互動,撰寫 Client 端的 Producer 和 Consumer 程式碼。


[ 系列文章目錄 ]

  1. [DATA] 訊息佇列 01 - Message Queue 介紹與實際應用
  2. [DATA] 訊息佇列 02 - RabbitMQ 簡介與 5 種設計模式
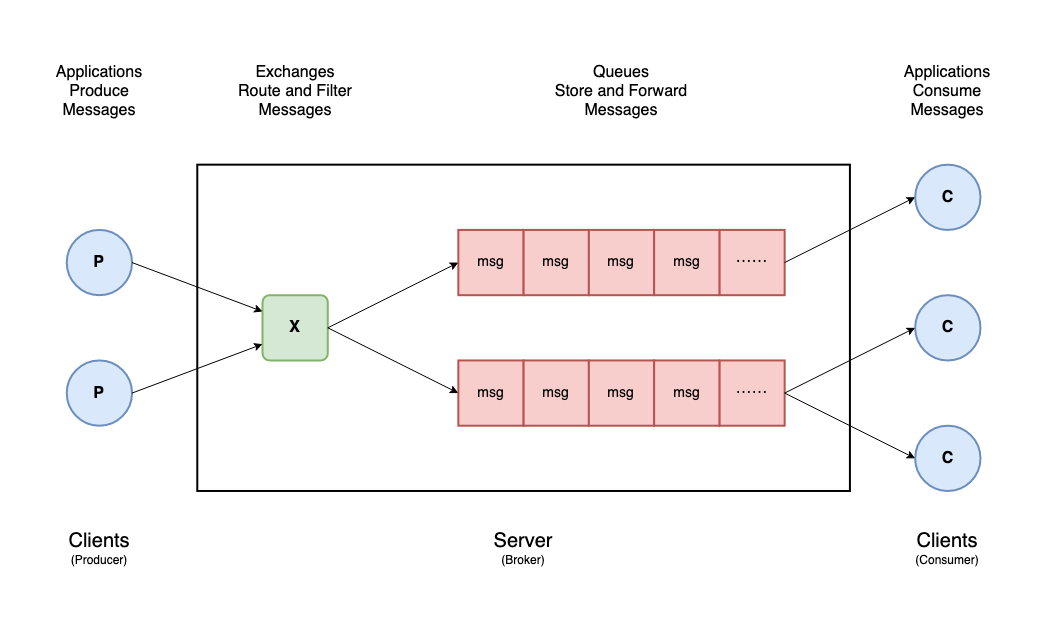
  3. [DATA] 訊息佇列 03 - RabbitMQ 架設方法與網頁管理介面
  4. [DATA] 訊息佇列 04 - RabbitMQ x Python 程式實作範例(本篇)

RabbitMQ Clients & Server

上一篇我們透過 Docker 來運行 RabbitMQ Server,也就是 Producer - Broker - Consumer 架構中的 Broker;現在我們要來實作 RabbitMQ Clients,包含推送訊息的 Producer 和消化訊息的 Consumer。

RabbitMQ Clients and Server

RabbitMQ Clients 有許多官方支持的 Libraries and Develoer Tools,可根據你熟悉的程式語言做選擇,本文將使用 pure-Python 的 Library: Pika

RabbitMQ Client Library (Python) - Pika

Introduction

Pika 是一個純 Python 開發的 RabbitMQ 函式庫 [ source code ] [ document ]

  • 使用 AMQP 0-9-1 protocol
  • 支援 Python 2.7 and 3.4+ 版

Installation

使用 PyPI 就可以簡單安裝 Pika。

1
pip install pika
Asynchronous pika

aio-pika 是使用 asyncio 的異步(Asynchronous)版的 RabbitMQ 函式庫 [ source code ] [ document ]

同樣使用 PyPI 安裝:pip install aio-pika

Development

建立連線(Connetion & Channel)

與自己本機(localhost)架設的 RabbitMQ 建立連線(5672 port),使用之前建設定的帳號密碼,得到一個連線(connection)的通道(channel)。

接下來大部分的操作都是在通道(channel)上進行,包括宣告 Queue、定義 Exchange、绑定 Queue 與 Exchange、發佈/接收訊息等。

1
2
3
4
5
6
7
8
import pika

credentials = pika.PlainCredentials('root', '1234')
parameters = pika.ConnectionParameters(host='localhost',
                                       port=5672,
                                       credentials=credentials)
connection = pika.BlockingConnection(parameters)
channel = connection.channel()
Connection 與 Channel 的差別為何?

Connection 是應用程式與 Broker 的真實 TCP 連接,Channel 則是其中的一個虛擬連接(AMQP),我們可以在應用程式中使用任意數量的虛擬連接(Channel),而不會因過多 TCP 連接(Connection)而導致 Broker 過載。

一般來說可以使用一個 Channel 來處理所有事情,但如果你有多個線程(multiple threads),建議為每個線程使用不同的 Channel。

更多詳細介紹可參考這篇:RabbitMQ and relationship between channel and connection

生產者(Producer)

首先宣告名稱為 hello 的 Queue(若不存在則會創建),接著對 Queue 發佈一則訊息 Hello World!,最後記得要關閉(close)連線。

在 RabbitMQ 中,訊息不能直接發送到 Queue,而必須經過一個 Exchange,本範例使用空字串 exchange,並使用與 Queue 名稱相同的 routing_key 綁定。

 1
 2
 3
 4
 5
 6
 7
 8
 9
10
11
channel.queue_declare(queue='hello')
# channel.queue_declare(queue=‘hello’, passive=False, durable=False, exclusive=False, auto_delete=False

msg = 'Hello World!'
channel.basic_publish(exchange='',
                      routing_key='hello',
                      body=msg)
print(f" [x] Sent '{msg}'")
#  [x] Sent 'Hello World!'

connection.close()

消費者(Consumer)

首先同樣是宣告名稱為 hello 的 Queue(必須與 Producer 的相同),接著從 Queue 裡取出訊息,確認訊息處理完要 ack,告知 Queue 可拋棄訊息;反之,訊息處理不如預期要 nack,訊息將再次回到 Queue。

訊息確認機制

Acknowledgements 是一種用於傳遞和處理確認的機制,當 RabbitMQ 向 Consumer 傳遞訊息時,它需要知道訊息是否發送成功,透過 method.delivery_tag 標記識別訊息。

  • channel.basic_ack(method.delivery_tag) 用於肯定確認
  • channel.basic_nack(method.delivery_tag) 用於否定確認

另外 consume 訊息的方法中,可以帶 auto_ack=True 參數,意即訊息取出後就自動肯定確認

更多詳細介紹可參考這篇:Consumer Acknowledgements and Publisher Confirms


Pika 提供三種從 RabbitMQ Broker 消費(consume)訊息的方法:

1. Using channel.basic_get() to consume a message

使用 basic_get() 方法,每次取出一則訊息,需要開發者手動調用。

1
2
3
4
5
6
7
8
channel.queue_declare(queue='hello')

channel.basic_get(queue='hello', auto_ack=True)
method, properties, body = channel.basic_get(queue='hello', auto_ack=True)
print(f" [x] Received {body.decode()}")
# channel.basic_ack(method.delivery_tag)

connection.close()
2. Using channel.basic_consume() to consume messages

使用 basic_consume 方法,指定收到訊息的 callback function,channel.start_consuming() 後就會持續監聽 Queue,直到手動關閉(stop)。

 1
 2
 3
 4
 5
 6
 7
 8
 9
10
11
12
13
14
15
16
17
18
19
20
channel.queue_declare(queue='hello')

def callback(ch, method, properties, body):

    print(f" [x] Received {body.decode()}")
    # channel.basic_ack(method.delivery_tag)

channel.basic_consume(queue='hello',
                      auto_ack=True,
                      on_message_callback=callback)

print(' [*] Waiting for messages. To exit press CTRL+C')
channel.start_consuming()

try:
    channel.start_consuming()
except KeyboardInterrupt:
    channel.stop_consuming()

connection.close()
3. Using channel.consume() generator to consume messages

consume 方法會返回生成器(generator),用 for loop 迭代取出訊息;若 Consumer 與 Queue 沒有活動(訊息傳遞)的狀態持續 inactivity_timeout 秒,將會收到 method, properties & body 皆等於 None

 1
 2
 3
 4
 5
 6
 7
 8
 9
10
11
channel.queue_declare(queue='hello')

for method, properties, body in channel.consume(queue='hello', auto_ack=True, inactivity_timeout=10):

    print(f" [x] Received {body.decode()}")
    # channel.basic_ack(method.delivery_tag)

    if method == None and properties == None and body == None:
        break

connection.close()

完整程式碼

producer.py

Producer 發佈 100 則訊息(字串 0 ~ 99)至名稱叫 hello 的 Queue。

 1
 2
 3
 4
 5
 6
 7
 8
 9
10
11
12
13
14
15
16
17
18
19
20
import pika


credentials = pika.PlainCredentials('root', '1234')
parameters = pika.ConnectionParameters(host='localhost',
                                       port=5672,
                                       credentials=credentials)
connection = pika.BlockingConnection(parameters)
channel = connection.channel()

channel.queue_declare(queue='hello')

for i in range(100):
    msg = str(i)
    channel.basic_publish(exchange='', 
                          routing_key='hello', 
                          body=msg)
    print(f" [x] Sent '{msg}'")

connection.close()
consumer.py

Consumer 從 Queue 裡取出訊息,每次取出一筆,在 callback function 打印出內容。

 1
 2
 3
 4
 5
 6
 7
 8
 9
10
11
12
13
14
15
16
17
18
19
20
21
22
23
24
25
26
27
28
29
import pika


credentials = pika.PlainCredentials('root', '1234')
parameters = pika.ConnectionParameters(host='localhost',
                                       port=5672,
                                       credentials=credentials)
connection = pika.BlockingConnection(parameters)
channel = connection.channel()

channel.queue_declare(queue='hello')

def callback(ch, method, properties, body):

    print(f" [x] Received {body.decode()}")
    # channel.basic_ack(method.delivery_tag)

channel.basic_consume(queue='hello',
                      auto_ack=True,
                      on_message_callback=callback)

print(' [*] Waiting for messages. To exit press CTRL+C')

try:
    channel.start_consuming()
except KeyboardInterrupt:
    channel.stop_consuming()

connection.close()

系列文總結

訊息佇列系列文終於寫完了,從介紹 Message Queue 是什麼開始,接著進入 RabbirMQ 簡介與設計模式,再到 RabbirMQ 架設和 Web UI 介紹,最後這篇是撰寫 Python 程式實作範例,其實還想補充更多我在專案中用到的一些技巧,不過就先放在心上吧~


讀者若有其他想知道的部分,或是實作上遇到的問題,可以在底下留言或聯繫告訴我!


本系列完結。

參考

https://pika.readthedocs.io/en/stable/modules/index.html

https://pika.readthedocs.io/en/stable/examples.html